![[Part 1] Frontend: Basic html/css/vanilla.js](https://images.unsplash.com/photo-1632882765546-1ee75f53becb?crop=entropy&cs=tinysrgb&fit=max&fm=jpg&ixid=M3wxMTc3M3wwfDF8c2VhcmNofDN8fGh0bWx8ZW58MHx8fHwxNzUwNDkwMzI4fDA&ixlib=rb-4.1.0&q=80&w=1920)
Introduction
การสร้างเว็บไซต์เริ่มต้นจากการเข้าใจ พื้นฐาน 3 อย่างนี้
- HTML (HyperText Markup Language) ที่ใช้จัดโครงสร้างของเว็บ
- CSS (Cascading Style Sheets) ที่ใช้ตกแต่งหน้าตา
- JavaScript ใช้จัดการ logic การแสดงผล และฟังก์ชันการทำงานต่างๆ
Setup node.js for development
- สร้าง project ผ่าน npm ใช้คำสั่ง
mkdir my-html-app: สร้าง directory สำหรับโปรเจค websitecd my-html-app: cmd เข้าไปที่โฟลเดอร์npm init -y: initial project ผ่าน npm
- สร้าง html file ชื่อ
index.html
<!DOCTYPE html>
<html lang="en">
<head>
  <meta charset="UTF-8">
  <title>My Local HTML</title>
</head>
<body>
  <h1>Hello from Node!</h1>
</body>
</html>
3. สร้าง node server ที่ใช้รัน html file โดยใช้ผ่าน express library
- ติดตั้ง express ก่อน ใช้คำสั่ง
npm install express - สร้างไฟล์
server.jsโดย initial โค้ดดังนี้
const express = require('express');
const app = express();

app.use(express.static(__dirname));

app.get('/', (req, res) => {
  res.sendFile(__dirname + '/index.html');
});

app.listen(3000, () => {
  console.log('Server running at http://localhost:3000');
});- รัน start server ผ่านคำสั่ง
node server.js - เปิด website เราผ่านทาง browser ไป url
http://localhost:3000
1️⃣ HTML
HTML เป็นภาษา Markup Language สำหรับสร้างโครงสร้างหน้าเว็บ จะประกอบ Tag ย่อยหลักๆ ดังนี้
<html>: ครอบทุกส่วนของหน้าเว็บ<head>: ข้อมูลส่วนหัว เช่น title, meta, link css<style>: ใช้สำหรับใส่ tag css สำหรับ ตกแต่ง element html
<body>: เนื้อหาที่แสดงผลในเว็บ<script>: ใช้สำหรับใส่ JavaScript
<!DOCTYPE html>
<html lang="en">
<head>
  <meta charset="UTF-8">
  <title>My Local HTML</title>
</head>
<body>
  <h1>Hello from Node!</h1>
</body>
</html>
HTML Tag ที่ใช้บ่อย
| Tag | ใช้ทำอะไร |
|---|---|
<h1>-<h6> | หัวข้อ (ใหญ่ไปเล็ก) |
<p> | ย่อหน้า |
<span> | ครอบข้อความส่วนเล็กๆ |
<table> | สร้างตาราง |
<button> | ปุ่มกด |
<a> | ลิงก์ไปหน้าอื่น |
<img> | ใส่รูปภาพ |
<div> | กล่องเปล่าๆ ไว้สำหรับแบ่งส่วนหน้าเว็บ |
Example
<!DOCTYPE html>
<html lang="en">

<head>
  <meta charset="UTF-8">
  <title>My Local HTML</title>
</head>

<body>
  <h1>หัวข้อหลัก</h1>
  <p>ย่อหน้าแรก</p>
  <span>ข้อความเล็กในย่อหน้า</span>
  <button>คลิกฉัน</button>
  <table border="1">
    <tr>
      <th>ชื่อ</th>
      <th>อายุ</th>
    </tr>
    <tr>
      <td>สมชาย</td>
      <td>25</td>
    </tr>
  </table>
</body>

</html>
2️⃣ การใช้งาน CSS
CSS เป็น script สำหรับใช้ตกแต่งหน้าตาเว็บ เช่น สี ขนาด การจัดวาง
CSS Properties ที่ใช้บ่อย
| Property | ความหมาย | ตัวอย่าง |
|---|---|---|
color | กำหนดสีตัวอักษร | color: red; |
background-color | กำหนดสีพื้นหลัง | background-color: yellow; |
font-size | ขนาดตัวอักษร | font-size: 20px; |
font-weight | ความหนาของตัวอักษร | font-weight: bold; |
text-align | จัดตำแหน่งข้อความ | text-align: center; |
padding | ระยะห่างภายในกล่อง | padding: 10px; |
margin | ระยะห่างภายนอกกล่อง | margin: 20px; |
border | เส้นขอบ | border: 1px solid black; |
width | ความกว้าง | width: 300px; |
height | ความสูง | height: 100px; |
display | การจัดแสดง | display: inline-block; |
position | การจัดวางตำแหน่ง | position: relative; top: 10px; left: 5px; |
วิธีใช้งาน CSS
- Inline: ใส่ใน tag เลย
<p style="color: blue;">ข้อความสีฟ้า</p>- Style Tag: ใช้ผ่าน
<style>
<!DOCTYPE html>
<html lang="en">

<head>
  <meta charset="UTF-8">
  <title>My Local HTML</title>
  <style>
    p {
      color: green;
    }
  </style>
</head>

<body>
  <h1>หัวข้อหลัก</h1>
  <p>ย่อหน้าแรก</p>
</body>

</html>- (Recommend) .css file: แยก .css ไฟล์แล้ว import เข้า html
/* styles.css */

h1 {
  color: red;
  font-size: 32px;
}

p {
  color: green;
}

<!-- index.html -->
<!DOCTYPE html>
<html lang="en">

<head>
  <meta charset="UTF-8">
  <title>My Local HTML</title>
  <link rel="stylesheet" href="styles.css" />
</head>

<body>
  <h1>หัวข้อหลัก</h1>
  <p>ย่อหน้าแรก</p>
</body>

</html>
CSS Class
tag ของ css ที่ใช้จัดกลุ่มของการตกแต่งหน้าเว็บ เราสามารถใช้ tag . ในการตั้งชื่อกลุ่มเฉพาะ และกำหนด scope ของการตกแต่งผ่านการเรียกใช้ class ได้
<!-- index.html -->
<!DOCTYPE html>
<html lang="en">

<head>
  <meta charset="UTF-8">
  <title>My Local HTML</title>
  <link rel="stylesheet" href="styles.css" />
  <style>
    .highlight {
      background-color: yellow;
    }
  </style>
</head>

<body>
  <h1>หัวข้อหลัก</h1>
  <p class="highlight">ข้อความสำคัญ</p>
</body>

</html>
CSS Framework
- เป็นกลุ่มของ Tag css ที่มี Developer เขียนไว้ใช้เราใช้งานอยู่แล้ว เราสามารถ import มาใช้ โดยศึกษาจาก class ที่มีระบุในเว็บไซต์ต้นทางได้เลย
- สามารถโหลดจาก CDN เข้ามาใช้ใน project ได้เลย
<!-- index.html -->
<!DOCTYPE html>
<html lang="en">

<head>
  <meta charset="UTF-8">
  <title>My Local HTML</title>
  <link rel="stylesheet" href="styles.css" />
  <link href="https://cdn.jsdelivr.net/npm/bootstrap@5.3.0/dist/css/bootstrap.min.css" rel="stylesheet" />
  </style>
</head>

<body>
  <button class="btn btn-primary">Primary Button</button>
  <table class="table table-striped">
    <tr>
      <th>ชื่อ</th>
      <th>อายุ</th>
    </tr>
    <tr>
      <td>สมหญิง</td>
      <td>30</td>
    </tr>
  </table>
</body>

</html>
3️⃣ Javascript
JavaScript ใช้เพิ่มความสามารถให้เว็บ เช่น
- ตอบสนองต่อการ click
- Redirect ไปยังหน้าจออื่น
- ตรวจสอบการทำงานตามเวลา
- การเปลี่ยนแปลงเนื้อหาบางส่วนของเว็บ
Javascript จะต้องเรียกใช้ผ่าน tag <script> หรือ import ไฟล์ .js เข้ามาใช้เท่านั้น
<script>ใน tag<body>
<!-- index.html -->
<!DOCTYPE html>
<html lang="en">

<head>
  <meta charset="UTF-8">
  <title>My Local HTML</title>
  <style>
    .highlight {
      background-color: yellow;
    }
  </style>
</head>

<body>
  <h1>หัวข้อหลัก</h1>
  <p class="highlight">ข้อความสำคัญ</p>
  <button onclick="sayHello()">คลิกฉันสิ</button>
  <script>
    function sayHello() {
      alert("สวัสดี!")
    }
  </script>
</body>

</html>- (Recommend) แยกไฟล์ .js แล้ว import ใช้งานใน html code
- app.js
// app.js
function sayHello() {
  alert("สวัสดี!");
}- index.html
<!-- index.html -->
<!DOCTYPE html>
<html lang="en">

<head>
  <meta charset="UTF-8">
  <title>My Local HTML</title>
  <style>
    .highlight {
      background-color: yellow;
    }
  </style>
</head>

<body>
  <h1>หัวข้อหลัก</h1>
  <p class="highlight">ข้อความสำคัญ</p>
  <button onclick="sayHello()">คลิกฉันสิ</button>
  <script src="app.js"></script>
</body>

</html>
การใช้งาน Javascript ทำงานหน้าเว็บ
- window event: ใช้ตรวจจับเมื่อหน้าจอมีการเปลี่ยนแปลง จะทำงานตาม function ที่ระบุไว้
window.resize: ตรวจจับเมื่อผู้ใช้ปรับขนาดหน้าต่างwindow.scroll: ตรวจจับเมื่อผู้ใช้เลื่อนหน้าจอwindow.load: ทำงานเมื่อโหลดหน้าเว็บเสร็จสมบูรณ์- event อื่นๆ: https://www.w3schools.com/jsref/dom_obj_event.asp
<!-- index.html -->
<!DOCTYPE html>
<html lang="en">

<head>
  <meta charset="UTF-8">
  <title>My Local HTML</title>
  <style>
    .highlight {
      background-color: yellow;
    }
  </style>
</head>

<body>
  <h1>หัวข้อหลัก</h1>
  <p class="highlight">ข้อความสำคัญ</p>
  <script>
    window.addEventListener("load", function () {
      alert("Welcome!!")
    })
  </script>
</body>

</html>- Redirect เปลี่ยนเว็บ/เปลี่ยนหน้า
<!-- index.html -->
<!DOCTYPE html>
<html lang="en">

<head>
  <meta charset="UTF-8">
  <title>My Local HTML</title>
  <style>
    .highlight {
      background-color: yellow;
    }
  </style>
</head>

<body>
  <h1>หัวข้อหลัก</h1>
  <p class="highlight">ข้อความสำคัญ</p>
  <button onclick="redirectToGoogle()">ไป Google</button>
  <script>
    function redirectToGoogle() {
      window.location.href = "https://www.google.com"
    }
  </script>
</body>

</html>- Alert / Confirm / Prompt
<!-- index.html -->
<!DOCTYPE html>
<html lang="en">

<head>
  <meta charset="UTF-8">
  <title>My Local HTML</title>
  <style>
    .highlight {
      background-color: yellow;
    }
  </style>
</head>

<body>
  <h1>หัวข้อหลัก</h1>
  <p class="highlight">ข้อความสำคัญ</p>
  <script>
    window.addEventListener("load", function () {
      alert("ยินดีต้อนรับสู่เว็บไซต์!")

      if (confirm("คุณต้องการไปต่อหรือไม่?")) {
        alert("ขอบคุณที่ไปต่อ")
      } else {
        alert("กลับบ้านแล้วนะ")
      }

      const name = prompt("กรอกชื่อของคุณ:")
      if (name) {
        alert("สวัสดี " + name)
      }
    })
  </script>
</body>

</html>- การจัดการ DOM
<!-- index.html -->
<!DOCTYPE html>
<html lang="en">

<head>
  <meta charset="UTF-8">
  <title>My Local HTML</title>
  <style>
    .highlight {
      background-color: yellow;
    }
  </style>
</head>

<body>
  <h1>หัวข้อหลัก</h1>
  <p id="message">ข้อความสำคัญ</p>
  <button onclick="changeText()">เปลี่ยนข้อความ</button>
  <script>
    function changeText() {
      document.getElementById("message").innerText = "ข้อความใหม่!"
    }
  </script>
</body>

</html>- SetTimeout / SetInterval
<!-- index.html -->
<!DOCTYPE html>
<html lang="en">
<head>
<meta charset="UTF-8">
<title>My Local HTML</title>
<style>
.highlight {
background-color: yellow;
}
</style>
</head>
<body>
<h1>หัวข้อหลัก</h1>
<p id="message">ข้อความสำคัญ</p>
<span>ทำงานมาแล้ว: </span>
<span id="duration">0</span>
<hr />
<button onclick="changeText()">เปลี่ยนข้อความ</button>
<script>
let duration = 0
function changeText() {
setTimeout(() => {
document.getElementById("message").innerText = "ข้อความใหม่!"
}, 2000)
}
setInterval(() => {
document.getElementById("duration").innerText = duration++
}, 1000);
</script>
</body>
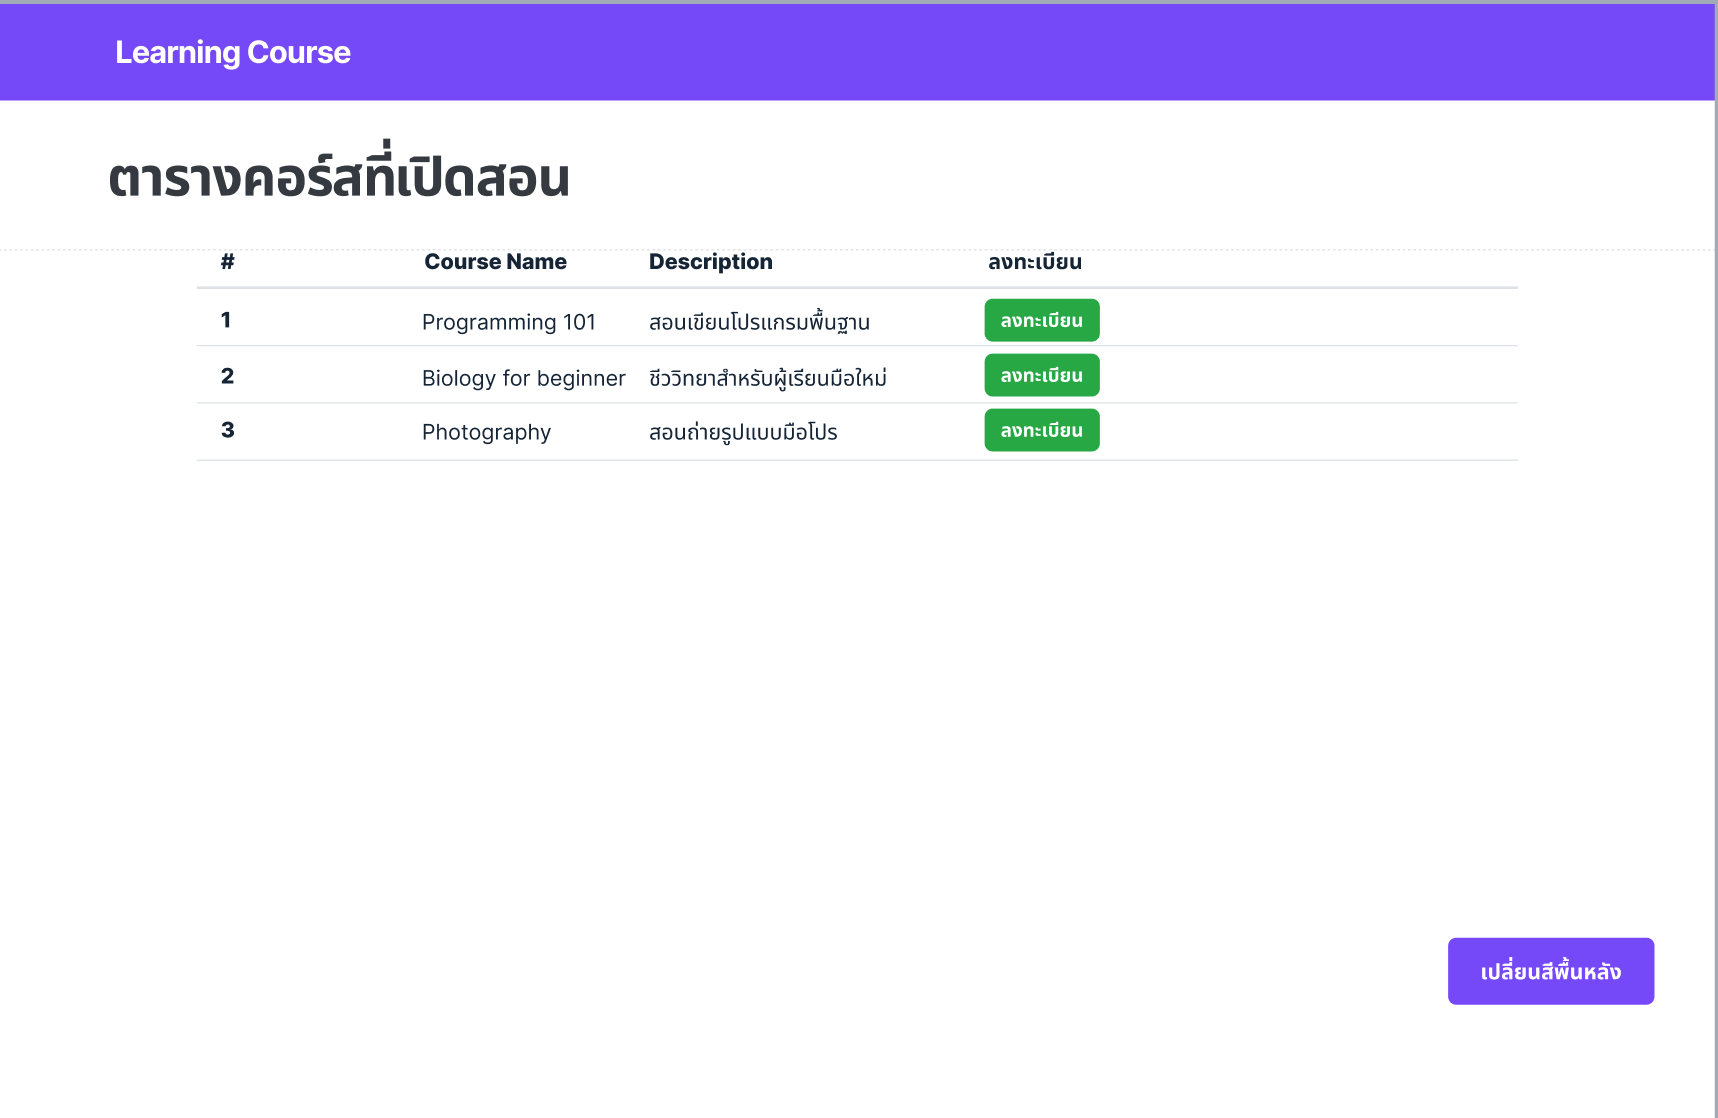
</html>Exercise
- สร้างหน้าเว็บแสดงรายวิชา
- มี
<h1>ชื่อเว็บ - มี
<table>แสดงรายวิชา โดยใช้ HTML, CSS และ framework ใช้ตกแต่งให้สวยงาม
- มี
- ทำปุ่มเปลี่ยนสีพื้นหลัง
- สร้าง
<button>1 ปุ่มที่ล่างขวาของหน้าจอ - เขียน JavaScript ให้คลิกแล้วเปลี่ยนสีพื้นหลัง
<body>เป็นสีเขียว
- สร้าง
- ใส่ปุ่มลงทะเบียนใน column สุดท้ายของแต่ละข้อมูล พร้อม style ด้วย Bootstrap
- ปุ่มใช้ class
btn btn-successโดยใส่ wording ว่าลงทะเบียน - คลิกแล้วแสดงข้อความ
ลงทะเบียนสำเร็จ
- ปุ่มใช้ class
Reference
W3Schools.com
W3Schools offers free online tutorials, references and exercises in all the major languages of the web. Covering popular subjects like HTML, CSS, JavaScript, Python, SQL, Java, and many, many more.
W3Schools.com
W3Schools offers free online tutorials, references and exercises in all the major languages of the web. Covering popular subjects like HTML, CSS, JavaScript, Python, SQL, Java, and many, many more.
Form controls
Give textual form controls like <input>s and <textarea>s an upgrade with custom styles, sizing, focus states, and more.

W3Schools.com
W3Schools offers free online tutorials, references and exercises in all the major languages of the web. Covering popular subjects like HTML, CSS, JavaScript, Python, SQL, Java, and many, many more.

![[Part 5] Frontend: Scaling Vue.js EP2](https://images.unsplash.com/photo-1653387137517-fbc54d488ed8?crop=entropy&cs=tinysrgb&fit=max&fm=jpg&ixid=M3wxMTc3M3wwfDF8c2VhcmNofDF8fHZ1ZXxlbnwwfHx8fDE3NTE3MDk3Nzl8MA&ixlib=rb-4.1.0&q=80&w=1140)
![[Part 4] Frontend: Scaling Vue.js EP.1](https://images.unsplash.com/photo-1607799279861-4dd421887fb3?crop=entropy&cs=tinysrgb&fit=max&fm=jpg&ixid=M3wxMTc3M3wwfDF8c2VhcmNofDF8fHZ1ZS5qc3xlbnwwfHx8fDE3NTExMzMwNDJ8MA&ixlib=rb-4.1.0&q=80&w=1140)
![[Part 3] Frontend: Modern Framework + Vue.js 3](https://images.unsplash.com/photo-1585076641399-5c06d1b3365f?crop=entropy&cs=tinysrgb&fit=max&fm=jpg&ixid=M3wxMTc3M3wwfDF8c2VhcmNofDN8fGpxdWVyeXxlbnwwfHx8fDE3NTA5NDYzMDl8MA&ixlib=rb-4.1.0&q=80&w=1140)