![[Part 4] Frontend: Scaling Vue.js EP.1](https://images.unsplash.com/photo-1607799279861-4dd421887fb3?crop=entropy&cs=tinysrgb&fit=max&fm=jpg&ixid=M3wxMTc3M3wwfDF8c2VhcmNofDF8fHZ1ZS5qc3xlbnwwfHx8fDE3NTExMzMwNDJ8MA&ixlib=rb-4.1.0&q=80&w=1920)
Custom Events
Vue รองรับการจัดการ event ได้ง่ายผ่าน directive @ เช่น @click, @input, @submit ซึ่งสามารถผูกฟังก์ชันโดยตรงใน template แต่นอกจาก event ที่มีอยู่แล้วเราสามารถใช้ defineEmits() เพื่อส่ง custom events ได้
ส่ง Event จาก Child ไปยัง Parent
// /src/components/ClickCounter.vue
<script setup>
  import { ref, defineEmits, watch } from 'vue'

  const emit = defineEmits(['increment'])
  const count = ref(0)

  watch(count, (newVal) => {
    emit('increment', newVal)
  })

  const incremental = () => {
    count.value++
  }
</script>

<template>
  <div class="green-bg">
    <h2>Clicked: {{ count }} times</h2>
    <p v-if="count > 5">More than 5 times clicked!</p>
    <button @click="incremental">Click</button>
  </div>
</template>
ฟัง Event ใน Parent Component
<script setup>
  import ClickCounter from './components/ClickCounter.vue'

  const showClick = (count) => {
    alert(`You clicked ${count} times!`)
  }
</script>

<template>
  <main>
    <ClickCounter @increment="showClick" />
  </main>
</template>
Component Slot
Slot คือช่องทางที่ Parent component สามารถส่งเนื้อหาภายใน HTML เข้ามาแสดงผลใน component ลูกได้ โดย component ลูกสามารถกำหนด “ช่อง” ไว้ให้แสดง content จากภายนอก
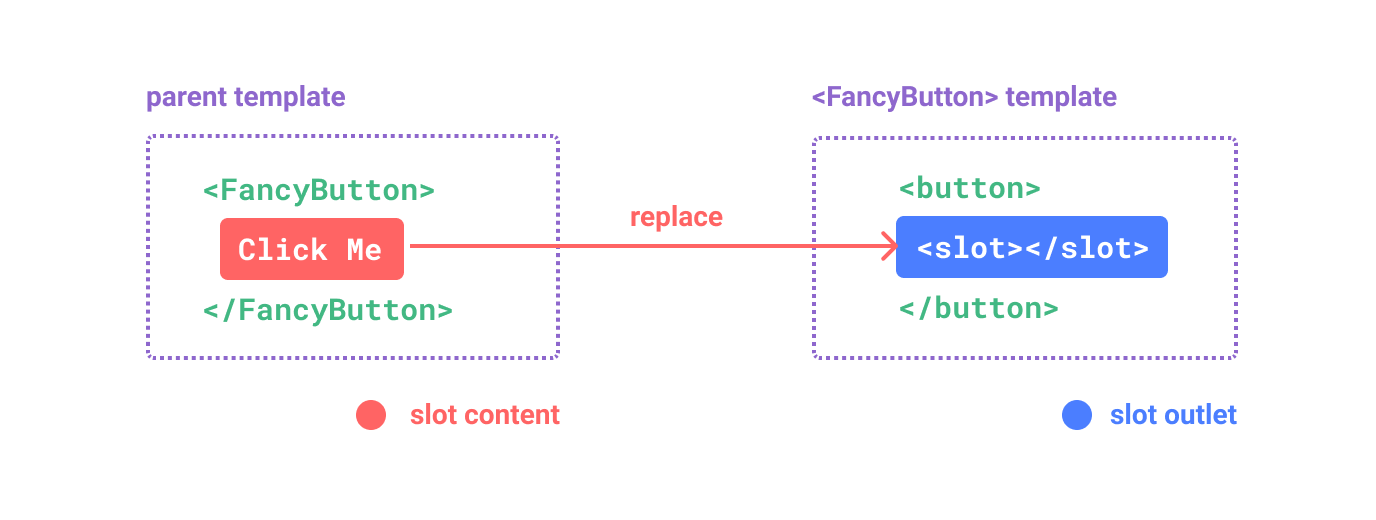
ประกาศ <slot> ใน child component
<script setup>
  import { computed, defineProps } from 'vue'

  const props = defineProps({
    firstName: String,
    lastName: String
  })

  const fullName = computed(() => {
    return `${props.firstName} ${props.lastName}`
  })
</script>

<template>
  <div class="red-bg">
    <h2>Hello, {{ fullName }}!</h2>
    <div class="message">
      <slot></slot>
    </div>
    <button @click="incremental">Submit</button>
  </div>
</template>
เพิ่ม content html ตอนเรียกใช้ component ใน Parent
<script setup>
  import MyProfile from './components/MyProfile.vue'

  const firstName = 'Pathompat'
  const lastName = 'Sungpankhao'
</script>

<template>
  <main>
    <MyProfile :first-name="firstName" :last-name="lastName">
      <p>ข้อความพิเศษ</p>
    </MyProfile>
  </main>
</template>
✅ ข้อดีของ Slot
- เพิ่มความยืดหยุ่นให้ component สามารถปรับ UI ได้ตาม context
- ลดความซ้ำซ้อนของการสร้าง component ใหม่
- เหมาะกับ UI component ที่ reusable เช่น Modal, Card, Layout
Composables
ฟังก์ชันที่ใช้ร่วมกับ Composition API เพื่อ แยก logic ที่สามารถนำกลับมาใช้ซ้ำ (Reusable) เช่น
- จัดการ state
- เรียก API
- ตรวจจับขนาดหน้าจอ
- จัดการ authentication
Composables เริ่มต้นชื่อด้วยuseเช่นuseCounter,useUser,useFetch
State management
เป็นการ centralized reactivity state ในระดับ global ได้ง่าย ๆ โดยใช้ Composables ช่วย
// src/stores/useCounter.js
import { ref } from 'vue'

const count = ref(0)

export function useCounter() {
  return {
    count,
    increment: () => count.value++,
    decrement: () => count.value--
  }
}
state นี้จะเป็น global ที่ทุก component ใช้ร่วมกันได้ ตัวอย่างวิธีเรียกใช้
<script setup>
  import { defineEmits, watch } from 'vue'
  import { useCounter } from '../composables/useCounter'

  const emit = defineEmits(['submit'])
  const { count, increment } = useCounter()

  watch(count, (newVal) => {
    emit('increment', newVal)
  })
</script>

<template>
  <div class="green-bg">
    <h2>Clicked: {{ count }} times</h2>
    <p v-if="count > 5">More than 5 times clicked!</p>
    <button @click="increment">Click</button>
  </div>
</template>API with Composables
เราสามารถใช้ Composible ช่วยจัดการ state ต่างๆ ได้ โดยใช้ร่วมกัน axios
npm install axios
- เพิ่ม
useApi.js
import { ref } from 'vue'
import axios from 'axios'

export function useApi(url) {
  const data = ref(null)
  const loading = ref(true)
  const error = ref(null)

  const fetchData = async () => {
    loading.value = true
    try {
      const res = await axios.get(url)
      data.value = res.data
    } catch (e) {
      error.value = e
    } finally {
      loading.value = false
    }
  }

  fetchData()

  return { data, loading, error, refetch: fetchData }
}- เรียกใช้ api ที่ต้องการใน component
<script setup>
import { useApi } from '@/composables/useApi'
const { data, loading, error } = useApi('https://api.open-meteo.com/v1/forecast?latitude=13.75&longitude=100.5¤t_weather=true')
console.log(data, loading, error)
</script>
<template>
<div v-if="loading">กำลังโหลด...</div>
<div v-else-if="error">เกิดข้อผิดพลาด: {{ error.message }}</div>
<ul v-else class="weather-list">
<li>lat: {{ data.latitude }}</li>
<li>long: {{ data.longitude }}</li>
<li>temp: {{ data.current_weather.temperature }}</li>
</ul>
</template>Class และ Style Binding
Vue ทำให้การจัดการ class และ style บน HTML element เป็นเรื่องง่ายและยืดหยุ่นผ่าน binding ด้วย :class และ :style
<script setup>
  import { defineEmits, watch } from 'vue'
  import { useCounter } from '../composables/useCounter'

  const { count, increment } = useCounter()
</script>

<template>
  <div :class="{ 'green-bg': count <= 5, 'red-bg': count > 5 }">
    <h2>Clicked: {{ count }} times</h2>
    <p v-if="count > 5">More than 5 times clicked!</p>
    <button @click="increment">Click</button>
  </div>
</template>

<style scoped>
  .green-bg {
    background-color: green;
    color: white;
    padding: 20px;
    border-radius: 5px;
  }

  .red-bg {
    background-color: #e03d3d;
    padding: 20px;
    border-radius: 5px;
    margin: 5px 0;
  }
</style>
Plugin
Plugin คือชุดของฟีเจอร์หรือฟังก์ชันที่สามารถติดตั้ง (install) เข้าไปในแอป Vue ได้ทั้งโปรเจกต์ เช่น
- เพิ่ม global component
- เพิ่ม global function หรือ property
- ใช้ library ภายนอก เช่น Vuetify, Pinia, Axios
Plugin Vuetify
- ติดตั้ง Vuetify (Vue 3)
npm install vuetify@next
npm install sass sass-loader -D
npm i @mdi/font- สร้างไฟล์
vuetify.jsใน folder ใหม่ชื่อ./src/plugins
import 'vuetify/styles'
import { createVuetify } from 'vuetify'
import { aliases, mdi } from 'vuetify/iconsets/mdi'
import * as components from 'vuetify/components'
import * as directives from 'vuetify/directives'
import '@mdi/font/css/materialdesignicons.css'

export const vuetify = createVuetify({
  icons: {
    defaultSet: 'mdi',
    aliases,
    sets: { mdi },
  },
  components,
  directives,
  theme: {
    defaultTheme: 'light'
  }
})- เพิ่ม plugin ใน
main.js
import { createApp } from 'vue'
import App from './App.vue'
import { vuetify } from './plugins/vuetify'

const app = createApp(App)
app.use(vuetify)
app.mount('#app')- ทดสอบใช้งาน Vuetify ตาม doc https://vuetifyjs.com/en/
- สร้าง
AppLayout.vueเพื่อครอบทั้งหน้าเว็บ
<script setup>
  import { ref } from 'vue'

  const drawer = ref(false)
  function toggleDrawer() {
    drawer.value = !drawer.value
  }
</script>

<template>
  <v-app>
    <v-app-bar app color="primary" dark>
      <v-app-bar-nav-icon @click="toggleDrawer" />

      <v-toolbar-title>My Website</v-toolbar-title>

      <v-spacer />

      <v-btn icon>
        <v-icon>mdi-bell</v-icon>
      </v-btn>

      <v-btn icon>
        <v-icon>mdi-account</v-icon>
      </v-btn>
    </v-app-bar>

    <v-navigation-drawer v-model="drawer" app>
      <v-list>
        <v-list-item to="/">
          <v-list-item-title>Home</v-list-item-title>
        </v-list-item>
        <v-list-item to="/about">
          <v-list-item-title>About</v-list-item-title>
        </v-list-item>
      </v-list>
    </v-navigation-drawer>

    <v-main>
      <slot />
    </v-main>
  </v-app>
</template>- update
App.vue
<script setup>
  import ClickCounter from './components/ClickCounter.vue'
  import MyProfile from './components/MyProfile.vue'
  import ShowWeather from './components/ShowWeather.vue'
  import AppLayout from './components/AppLayout.vue'
</script>

<template>
  <AppLayout>
    <MyProfile :first-name="firstName" :last-name="lastName">
      <p>ข้อความพิเศษ</p>
    </MyProfile>
    <ClickCounter @increment="showClick" />
    <ShowWeather />
  </AppLayout>
</template>
Assignment
- ใช้ API จาก https://newsdata.io/search-news โดยต้องขอ API Key เพื่อใช้ฟรี 200 ครั้ง
- ใช้ API กรองข่าวทั้งหมดที่เกียวกับปัญหากัมพูชาและไทยล่าสุด ตัวอย่าง API Endpoint:
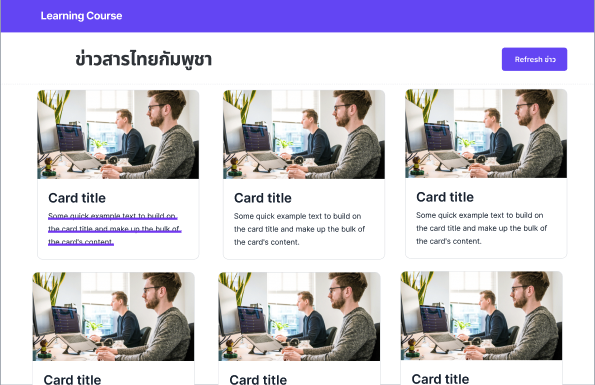
https://newsdata.io/api/1/latest?apikey=pub_xxxx&q=Cambodia Thailand Conflict - สร้าง Vue Application โดยมีหน้าจอ 1 หน้า แสดงผลดังนี้
- App bar, Navbar
- หน้าจอหลักส่วน Content แสดงผลข่าวทั้งหมด
- ถ้ามีรูปแสดงผลด้านบนของการ์ด (ตามตัวอย่างข้างล่าง) จาก field
result.image_url - Card Title:
results.title
- ถ้ามีรูปแสดงผลด้านบนของการ์ด (ตามตัวอย่างข้างล่าง) จาก field
- Card Description:
results.descriptionถ้า description ของ news ยาวเกิน 4 บรรทัด ให้ตัดการแสดงผลหลังจากนั้นให้ แสดงผล... - มีปุ่มโหลดข้อมูลใหม่ บนขวาของหน้าจอ
Reference


![[Part 5] Frontend: Scaling Vue.js EP2](https://images.unsplash.com/photo-1653387137517-fbc54d488ed8?crop=entropy&cs=tinysrgb&fit=max&fm=jpg&ixid=M3wxMTc3M3wwfDF8c2VhcmNofDF8fHZ1ZXxlbnwwfHx8fDE3NTE3MDk3Nzl8MA&ixlib=rb-4.1.0&q=80&w=1140)
![[Part 3] Frontend: Modern Framework + Vue.js 3](https://images.unsplash.com/photo-1585076641399-5c06d1b3365f?crop=entropy&cs=tinysrgb&fit=max&fm=jpg&ixid=M3wxMTc3M3wwfDF8c2VhcmNofDN8fGpxdWVyeXxlbnwwfHx8fDE3NTA5NDYzMDl8MA&ixlib=rb-4.1.0&q=80&w=1140)
![[Part 2] Frontend: Intermediate html/css/js](https://images.unsplash.com/photo-1669023414166-a4cc7c0fe1f5?crop=entropy&cs=tinysrgb&fit=max&fm=jpg&ixid=M3wxMTc3M3wwfDF8c2VhcmNofDR8fGh0bWx8ZW58MHx8fHwxNzUwNDkwMzI4fDA&ixlib=rb-4.1.0&q=80&w=1140)