![[Part 3] Frontend: Modern Framework + Vue.js 3](https://images.unsplash.com/photo-1585076641399-5c06d1b3365f?crop=entropy&cs=tinysrgb&fit=max&fm=jpg&ixid=M3wxMTc3M3wwfDF8c2VhcmNofDN8fGpxdWVyeXxlbnwwfHx8fDE3NTA5NDYzMDl8MA&ixlib=rb-4.1.0&q=80&w=1920)
ใน Part นี้ เราจะมาทำความรู้จักกับ Frontend Framework โดยเฉพาะ Vue.js เวอร์ชัน 3 ซึ่งใช้งานร่วมกับ Composition API ที่ทันสมัยและมีประสิทธิภาพมากขึ้น เหมาะสำหรับผู้ที่ต้องการสร้างเว็บแอปที่ยืดหยุ่นและดูแลรักษาง่าย
1. Frontend Framework
เครื่องมือที่ช่วยให้การพัฒนา UI ของเว็บมีระบบและง่ายขึ้น เช่น การแบ่งหน้าเว็บออกเป็น components, การจัดการ state, การ routing ฯลฯ
ข้อดี
- ช่วยจัดการ code ให้เป็นระบบมากขึ้น
- สนับสนุนการพัฒนาแบบ modular และ reusable component
- มี community และ ecosystem ใหญ่ เช่น plugin, UI component
ข้อเสีย
- มี learning curve สูง (โดยเฉพาะ framework อย่าง Angular)
- ต้องมีการ setup และ tooling เพิ่ม
คำศัพท์ที่ต้องรู้จัก
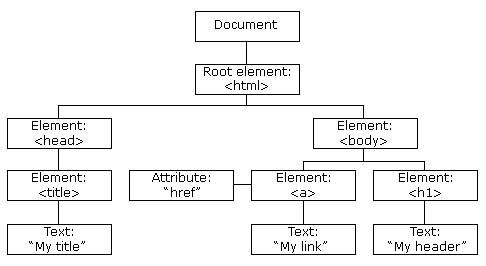
- DOM (Document Object Model) เมื่อหน้าเว็บนึงโหลดเสร็จเรียบร้อยแล้วเนี่ย เจ้า Browser มันจะสร้าง DOM ของหน้านั้นขึ้นมา ก็คือเจ้า Browser จะมอง HTML เป็นต้นไม้
- SPA (Single Page Application) คือเทคนิคในการทำเว็บไซต์ให้ไม่มีการรีโหลดเว็บเวลาคลิกเพื่อไปหน้าต่อไป (หรือก็คือไม่เปลี่ยน URL นั่นเอง) ถ้าขยายความก็คือเมื่อคลิกปุ่มแล้ว มันจะดึงข้อมูลส่วนแสดงผลเพียงแค่บางส่วนที่จำเป็น (ใน SPA จะใช้ JavaScript เพื่อดึงข้อมูล) ไม่จำเป็นที่จะต้องโหลดใหม่ทั้งหน้าเหมือนปกติ
- SSR (Server Side Rendering) หมายถึงการประมวลผล HTML ของหน้าเว็บที่ฝั่งเซิร์ฟเวอร์ก่อนส่งไปยังเบราว์เซอร์ของผู้ใช้งาน ทำให้หน้าเว็บโหลดได้เร็วขึ้นและเป็นมิตรกับ SEO มากขึ้น
- Web Component เป็นมาตรฐานเพื่อให้ทุกคนเขียน component ไปในทางเดียวกัน ประกอบไปด้วย 4 ส่วนย่อยๆ ดังนี้
- HTML Templates เอาไว้กำหนด markup ที่คิดว่าจะนำมาใช้ซ้ำในส่วนอื่นๆ
- Shadow DOM คือ DOM อีกประเภทหนึ่ง ที่แสดงผลออกมาเหมือน DOM แบบปกติ แต่จะไม่ได้รับผลใดๆ จาก css และ js ของหน้านั้นๆ
- Custom Elements เอาไว้สร้าง HTML Element ใหม่ขึ้นมาใช้เอง
- HTML Imports เอาไว้ import ไฟล์ html เข้ามา (คล้ายๆ กับการ import ไฟล์ css)
2. Framework vs Vanilla JS vs jQuery
| หัวข้อ | Vanilla JS | jQuery | Frontend Framework |
|---|---|---|---|
| ความเร็วในการเริ่มต้น | ✅ | ✅ | ❌ (ต้อง setup) |
| จัดการ DOM | ❌ (ซับซ้อน) | ✅ | ✅ (ผ่าน virtual DOM) |
| การจัดการ state | ❌ | ❌ | ✅ |
| Component-based | ❌ | ❌ | ✅ |
| รองรับ SPA | ❌ | ✅ (จำกัด) | ✅ |
3. ตัวอย่าง Frontend Framework ที่นิยม
- React.js - พัฒนาโดย Facebook ใช้กันอย่างแพร่หลาย มีความยืดหยุ่นสูง
- Vue.js - ใช้ง่าย เหมาะสำหรับผู้เริ่มต้น โดยเฉพาะ Vue 3 + Composition API
- Angular - พัฒนาโดย Google เป็น framework แบบ full-featured สำหรับโปรเจกต์ enterprise
- Svelte - Framework ที่คอมไพล์เป็น JavaScript แบบไม่มี Virtual DOM ทำให้เบาและเร็วมาก
- Flutter Web - Framework ที่มีพื้นฐานมาจาก Cross-platform mobile app แต่สามารถ convert ให้รองรับเว็บไซต์ได้เช่นกัน
4. เริ่มต้นใช้งาน Vue 3
ติดตั้งผ่าน Vue CLI
npm install -g @vue/cli
vue create vue3-app
cd vue3-app
npm run serve
โครงสร้าง Project
vue3-app/
├── public/
├── src/
│   ├── assets/
│   ├── components/
│   ├── views/
│   ├── App.vue
│   └── main.js
5. Component
เมื่อเราสร้างโปรเจกต์ด้วย Vue CLI จะมีโฟลเดอร์ src/components/ สำหรับเก็บ component ย่อยทั้งหมด เช่น HelloWorld.vue, Navbar.vue, MyCard.vue
ขั้นตอนนี้ให้เราลองปรับ HelloWorld.vue เป็นดังนี้
// src/components/HelloWorld.vue
<script setup>
  import { ref } from 'vue'

  const name = ref('Pathompat')
</script>

<template>
  <div>
    <h2>Hello, {{ name }}!</h2>
  </div>
</template>
การนำ component ไปใช้ในหน้าอื่น
ต้อง import และเรียกใช้เหมือน Tag html ทั่วไป
<script setup>
  import HelloWorld from './components/HelloWorld.vue'
</script>

<template>
  <main>
    <HelloWorld />
  </main>
</template>
6. Lifecycle
ช่วงเวลาในกระบวนการทำงานของ component ตั้งแต่เริ่มสร้างจนถูกทำลาย เราสามารถเขียน logic ให้ทำงานในแต่ละช่วงได้ เช่น การโหลดข้อมูลเมื่อ component ถูกแสดงผล หรือเคลียร์ค่าต่าง ๆ เมื่อ component ถูกปิด

Vue 3 ให้เราใช้ lifecycle hook ผ่านฟังก์ชัน เช่น onMounted, onUpdated, onUnmounted ภายใน <script setup> ได้เลย
<script setup>
  import { onBeforeMount, onMounted, onUpdated, onUnmounted } from 'vue'

  onBeforeMount(() => {
    console.log('ก่อน component จะถูก mount')
  })

  onMounted(() => {
    console.log('component ถูก mount แล้ว')
  })

  onUpdated(() => {
    console.log('component มีการอัปเดต DOM')
  })

  onUnmounted(() => {
    console.log('component กำลังจะถูกลบ')
  })
</script>
7. Variable
- Reactivity State: เป็นตัวแปรสำหรับใช้กำหนดสถานะภายใน Component นั้นๆ
<script setup>
  import { ref } from 'vue'

  const name = ref('Pathompat')

  const updateName = () => {
    name.value = 'New Name ' + Math.random().toFixed(2)
  }
</script>

<template>
  <div>
    <h2>Hello, {{ name }}!</h2>
    <button @click="updateName">Update Name</button>
  </div>
</template>- Computed: ใช้สำหรับรวมค่าหลายตัวแปร
<script setup>
  import { ref, computed } from 'vue'

  const firstName = ref('Pathompat')
  const lastName = ref('Sungpankhao')

  const fullName = computed(() => `${firstName.value} ${lastName.value}`)
</script>

<template>
  <div>
    <h2>Hello, {{ fullName }}!</h2>
  </div>
</template>- watch(): ใช้สำหรับตรวจจับการเปลี่ยนแปลงของ Reactivity State
<script setup>
  import { ref, computed, watch } from 'vue'

  const firstName = ref('Pathompat')
  const lastName = ref('Sungpankhao')
  const count = ref(0)

  const fullName = computed(() => {
    return `${firstName.value} ${lastName.value}`
  })

  const incremental = () => {
    count.value++
  }

  watch(count, (newVal, oldVal) => {
    console.log(`คลิกเปลี่ยนจาก ${oldVal} เป็น ${newVal}`)
  })
</script>

<template>
  <div>
    <h2>Hello, {{ fullName }}!</h2>
    <p>Clicked: {{ count }}</p>
    <button @click="incremental">Click</button>
  </div>
</template>- Props: เป็นตัวแปรชนิดหนึ่งที่ใช้รับค่าที่มาจากนอก Component
- HelloWorld.vue
<script setup>
  import { ref, computed, watch, defineProps } from 'vue'

  const props = defineProps({
    firstName: String,
    lastName: String
  })
  const count = ref(0)

  const fullName = computed(() => {
    return `${props.firstName} ${props.lastName}`
  })

  const incremental = () => {
    count.value++
  }

  watch(count, (newVal, oldVal) => {
    console.log(`คลิกเปลี่ยนจาก ${oldVal} เป็น ${newVal}`)
  })
</script>

<template>
  <div>
    <h2>Hello, {{ fullName }}!</h2>
    <p>Clicked: {{ count }}</p>
    <button @click="incremental">Click</button>
  </div>
</template>- App.vue
<script setup>
  import HelloWorld from './components/HelloWorld.vue'
</script>

<template>
  <main>
    <HelloWorld first-name="Pathompat" last-name="Sungpankhao" />
  </main>
</template>
8. Template Syntax
Interpolation
ใช้ {{ }} เพื่อแสดงค่าตัวแปรใน template
<p>สวัสดี {{ name }}</p>Attribute Bindings
ใช้ :ชื่อตัวแปร ผูก attribute กับค่าตัวแปร
<div :id="dynamicId"></div>Directives
- Conditional
<p v-if="count > 5">คุณคลิกเกิน 5 ครั้ง</p>
<p v-else-if="count === 5">คุณคลิก 5 ครั้ง</p>
<p v-else>คุณคลิกไม่ถึง 5 ครั้ง</p>- Iteration
<script setup>
  import { ref, computed, watch, defineProps } from 'vue'

  const props = defineProps({
    firstName: String,
    lastName: String
  })
  const items = ref(['Item 1', 'Item 2', 'Item 3'])
</script>

<template>
  <div>
    <ul>
      <li v-for="(item, index) in items" :key="index">{{ item }}</li>
    </ul>
  </div>
</template>v-modelใช้ทำ two-way binding ระหว่างตัวแปร https://vuejs.org/guide/components/v-model.html@clickและ event อื่นๆ ใช้ hanlding event ต่างๆ ของ component https://vuejs.org/guide/essentials/event-handling#event-modifiers
Reference


![[Part 5] Frontend: Scaling Vue.js EP2](https://images.unsplash.com/photo-1653387137517-fbc54d488ed8?crop=entropy&cs=tinysrgb&fit=max&fm=jpg&ixid=M3wxMTc3M3wwfDF8c2VhcmNofDF8fHZ1ZXxlbnwwfHx8fDE3NTE3MDk3Nzl8MA&ixlib=rb-4.1.0&q=80&w=1140)
![[Part 4] Frontend: Scaling Vue.js EP.1](https://images.unsplash.com/photo-1607799279861-4dd421887fb3?crop=entropy&cs=tinysrgb&fit=max&fm=jpg&ixid=M3wxMTc3M3wwfDF8c2VhcmNofDF8fHZ1ZS5qc3xlbnwwfHx8fDE3NTExMzMwNDJ8MA&ixlib=rb-4.1.0&q=80&w=1140)
![[Part 2] Frontend: Intermediate html/css/js](https://images.unsplash.com/photo-1669023414166-a4cc7c0fe1f5?crop=entropy&cs=tinysrgb&fit=max&fm=jpg&ixid=M3wxMTc3M3wwfDF8c2VhcmNofDR8fGh0bWx8ZW58MHx8fHwxNzUwNDkwMzI4fDA&ixlib=rb-4.1.0&q=80&w=1140)