![[Part 5] Frontend: Scaling Vue.js EP2](https://images.unsplash.com/photo-1653387137517-fbc54d488ed8?crop=entropy&cs=tinysrgb&fit=max&fm=jpg&ixid=M3wxMTc3M3wwfDF8c2VhcmNofDF8fHZ1ZXxlbnwwfHx8fDE3NTE3MDk3Nzl8MA&ixlib=rb-4.1.0&q=80&w=1920)
Vue Router
ใช้ในการจัดการการนำทางภายในเว็บไซต์ที่พัฒนาด้วย Vue.js เพื่อสร้าง Single Page Application (SPA) โดยช่วยจัดการการแสดงผลของแต่ละหน้าอย่างเป็นระบบ ไม่จำเป็นต้องโหลดหน้าเว็บใหม่
การติดตั้ง Vue Router
npm install vue-router@4Import vue-router ใน main.js
import { createApp } from 'vue'
import App from './App.vue'
import { vuetify } from './plugins/vuetify'
import router from './router'

const app = createApp(App)
app.use(vuetify)
app.use(router)

app.mount('#app')
File ตัวอย่าง router/index.js
import { createRouter, createWebHistory } from 'vue-router';
import HomePage from '../views/HomePage.vue';
import AboutPage from '../views/AboutPage.vue';
import UserDetailPage from '@/views/UserDetailPage.vue'
import LoginPage from '@/views/LoginPage.vue'

const routes = [
  { path: '/login', component: LoginPage },
  { path: '/', component: HomePage },
  { path: '/about', component: AboutPage },
  { path: '/user/:id', component: () => UserDetailPage },
];

const router = createRouter({
  history: createWebHistory(),
  routes,
});

export default router;
Folder structure เมื่อมี Router
src/
├── components/
│   ├── Home.vue
│   ├── About.vue
│   └── Profile.vue
├── router/
│   └── index.js
├── views/
│   ├── HomePage.vue
│   └── AboutPage.vue
└── main.jscomponents: เก็บ component ที่สามารถนำไปใช้งานซ้ำได้views: เก็บ component หลักที่ใช้แสดงผลหน้าเว็บrouter: เก็บการตั้งค่า router
การใช้งาน <router-view> และ <router-link>
<router-view>ใช้สำหรับแสดง component ที่ตรงกับ route ปัจจุบัน
<router-view></router-view><router-link>ใช้สำหรับสร้างลิงก์เพื่อเปลี่ยน route โดยไม่ต้องรีเฟรชหน้า
<router-link to="/about">About</router-link>Example
- ปรับ App.vue ให้รองรับ router
<script setup>
  import AppLayout from './components/layout/AppLayout.vue'
</script>

<template>
  <AppLayout>
    <router-view></router-view>
  </AppLayout>
</template>
Parameter & Query Parameter
Vue Router ยังรองรับการส่งค่า Parameter และ Query Parameter ได้อีกด้วย
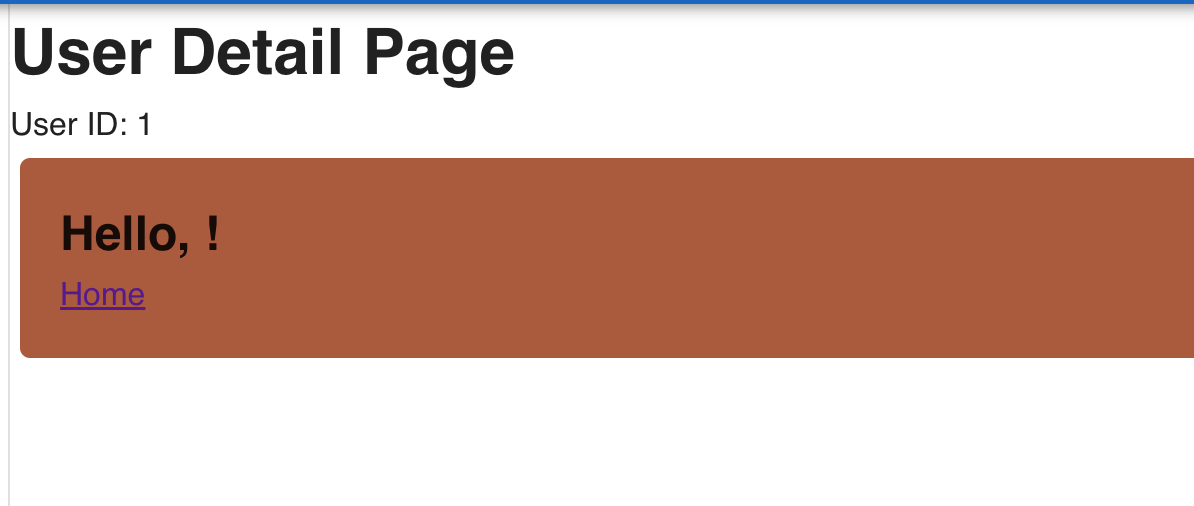
Parameter
- แก้ไขใน router file
const routes = [
  ...
  { path: '/user/:id', component: UserDetailPage },
  ...
];- เพิ่ม code ใน component
<script setup>
  import MyProfile from '@/components/MyProfile.vue'
  import { ref } from 'vue'
  import { useRoute } from 'vue-router'

  const route = useRoute();
  console.log(route.params.id);

  const firstName = ref('')
  const lastName = ref('')
</script>

<template>
  <div>
    <h1>User Detail Page</h1>
    <p>User ID: {{ route.params.id }}</p>
    <MyProfile :first-name="firstName" :last-name="lastName"/>
  </div>
</template>- ทดสอบเข้า link: http://localhost:8080/user/1
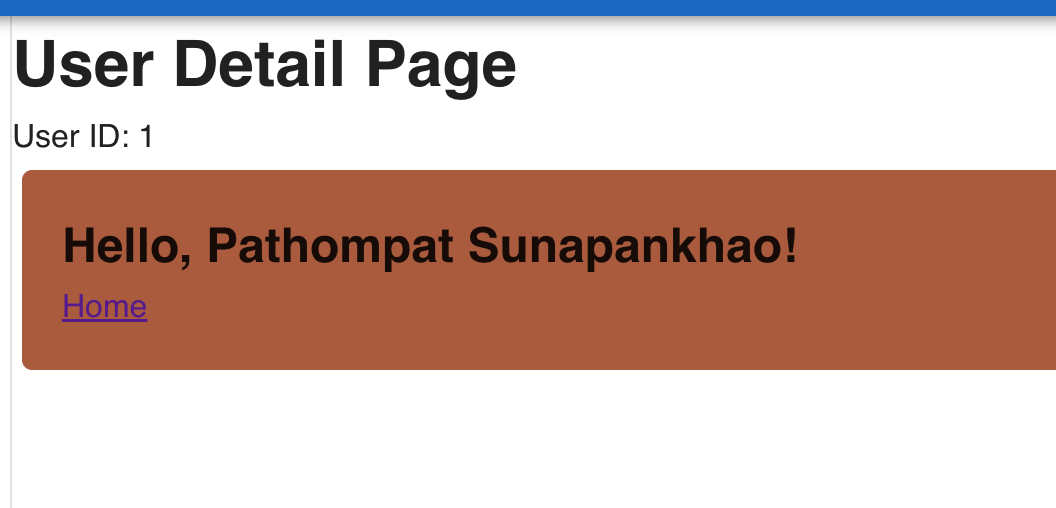
Query Parameter:
เพิ่ม code ใน component:
<script setup>
  import MyProfile from '@/components/MyProfile.vue'
  import { useRoute } from 'vue-router'

  const route = useRoute();
  const firstName = route.query.firstname;
  const lastName = route.query.lastname;
</script>

<template>
  <div>
    <h1>User Detail Page</h1>
    <p>User ID: {{ route.params.id }}</p>
    <MyProfile :first-name="firstName" :last-name="lastName"/>
  </div>
</template>
ทดสอบเข้า link: http://localhost:8080/user/1?firstname=Pathompat&lastname=Sunapankhao
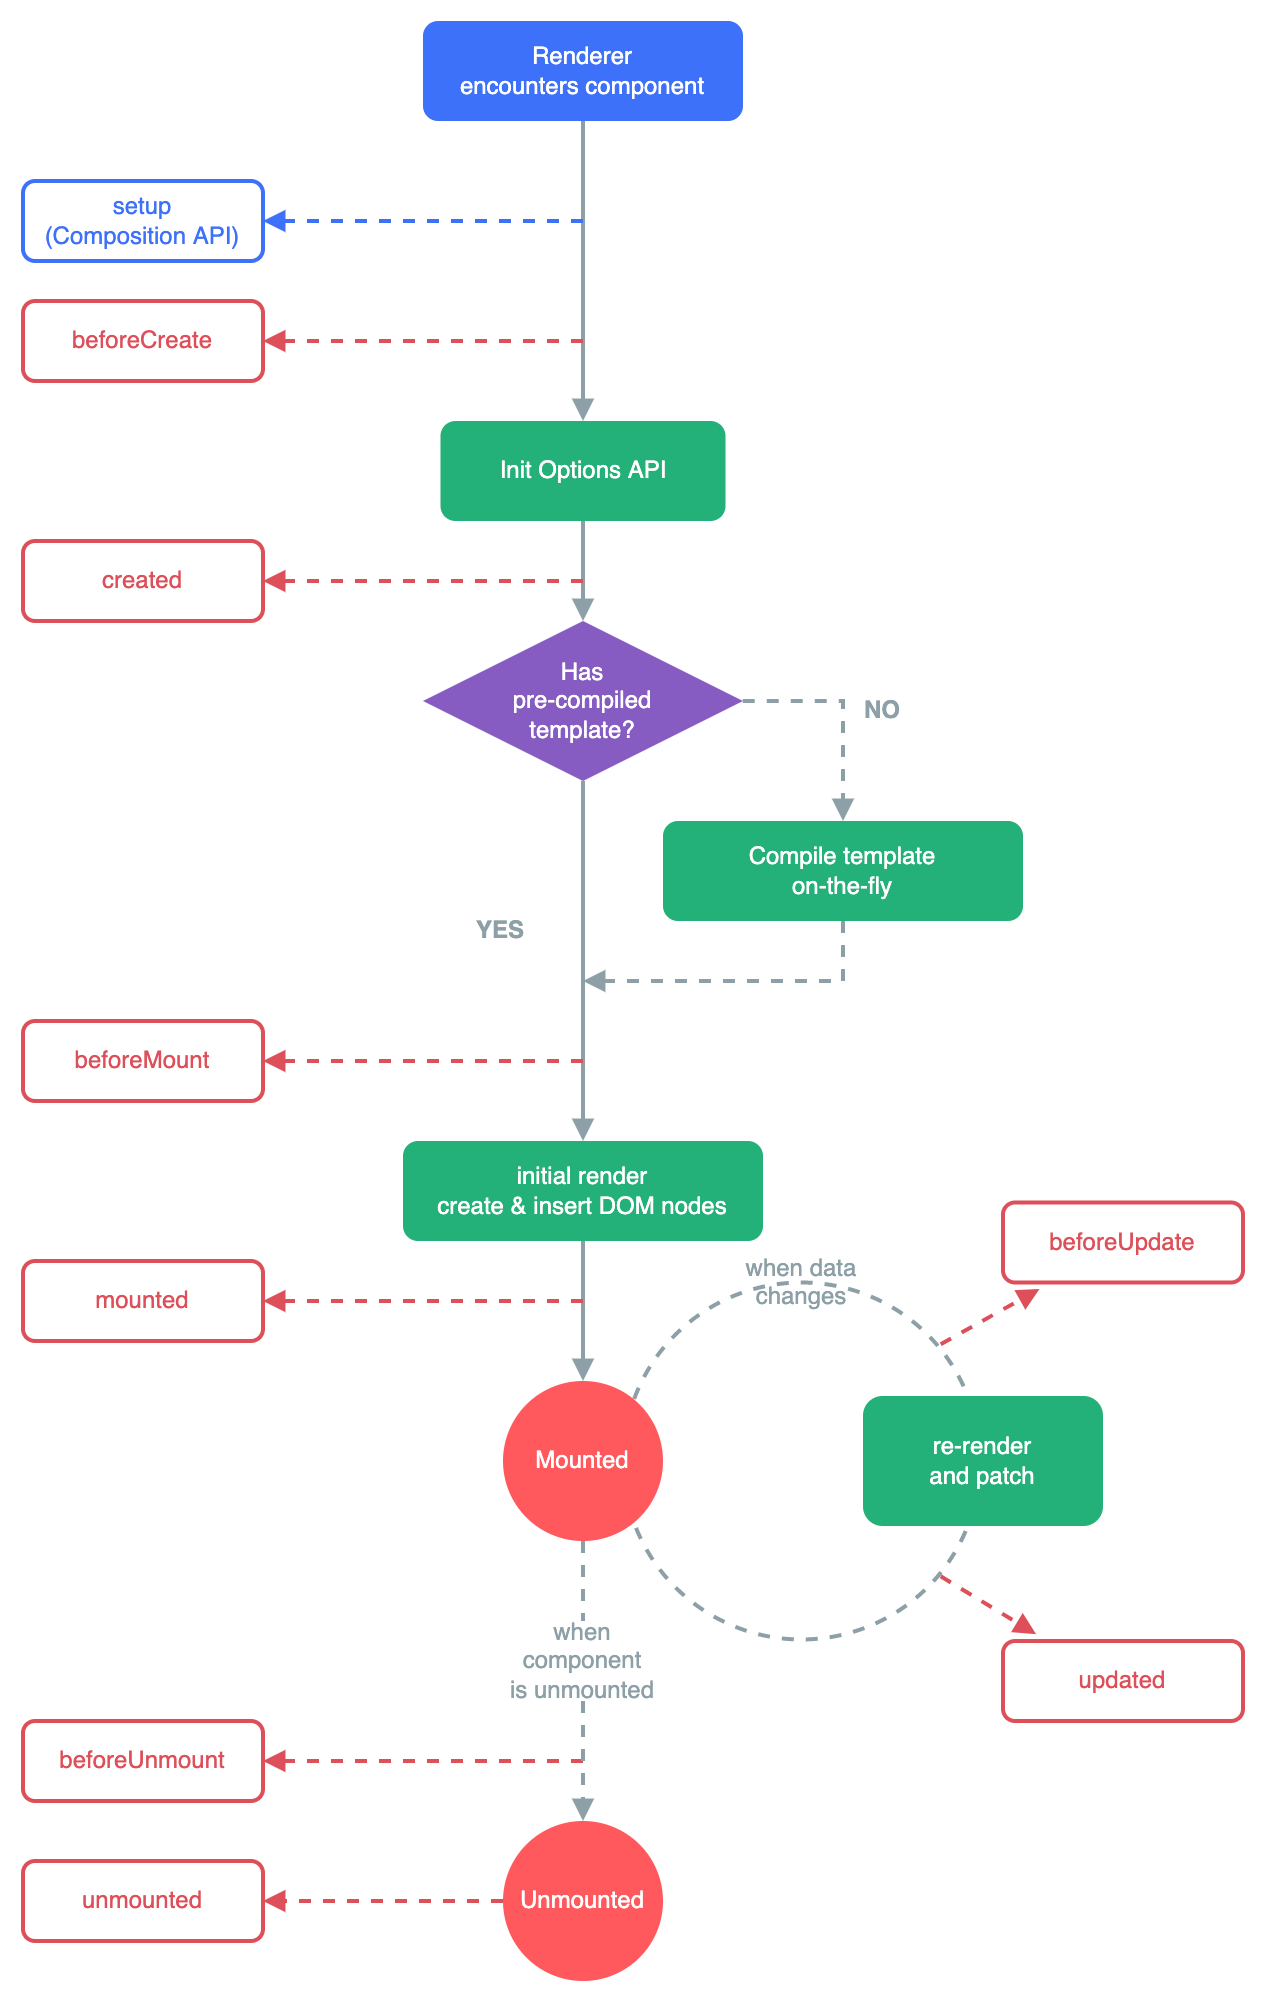
Lifecycle
วงจรชีวิตของ Component ใน Vue.js โดยมีช่วงหลักๆ ที่นิยมใช้งานดังนี้:
onMounted: เรียกใช้หลังจาก component ถูก mountonUpdated: เรียกเมื่อมีการอัปเดต componentonUnmounted: เรียกเมื่อ component ถูกลบออกจาก DOM
Code example: AboutPage.vue
<script setup>
  import MyProfile from '@/components/MyProfile.vue'
  import { ref, onMounted, onUnmounted } from 'vue'

  const firstName = ref('Pathompat')
  const lastName = ref('Sungpankhao')

  onMounted(() => {
    console.log('Component is mounted!');
  });

  onUnmounted(() => {
    console.log('Component is unmounted!');
  });
</script>

<template>
  <MyProfile :first-name="firstName" :last-name="lastName"/>
</template>
Storage Management
เป็นการจัดเก็บข้อมูลฝั่งผู้ใช้งาน (Client-Side) ซึ่งสามารถนำมาใช้เพื่อบันทึกสถานะการใช้งาน การตั้งค่า หรือข้อมูลอื่น ๆ ที่ต้องการให้จำอยู่ระหว่างการใช้งานหรือหลังจากปิดหน้าเว็บแล้วกลับมาใหม่ โดยไม่ต้องส่งกลับไปยังเซิร์ฟเวอร์เสมอไป
Vue.js ไม่มีระบบ storage management ในตัวโดยตรง แต่สามารถใช้ API พื้นฐานของเว็บเบราว์เซอร์อย่าง Local Storage และ Session Storage ได้ง่ายภายใน component
ประเภทของ Storage
1. Local Storage
- เก็บข้อมูลแบบ key-value
- ข้อมูลคงอยู่แม้ปิดหน้าเว็บหรือปิดเบราว์เซอร์
- ใช้ได้กับกรณี: การจดจำชื่อผู้ใช้, theme, language settings
2. Session Storage
- เหมือนกับ Local Storage แต่ข้อมูลจะหายไปเมื่อปิดแท็บหรือปิดเบราว์เซอร์
- ใช้ได้กับกรณี: การเก็บข้อมูลชั่วคราวใน session เช่น token แบบไม่ถาวร หรือค่าที่ต้อง reset ทุก session
การจัดการ Storage ใน Vue.js สามารถทำได้ผ่าน Local Storage หรือ Session Storage
ตัวอย่างการใช้งาน Storage:
// local storage
localStorage.setItem('username', 'JohnDoe');
const username = localStorage.getItem('username');
localStorage.removeItem('username');

// session storage
sessionStorage.setItem('sessionID', 'abc123');
const sessionID = sessionStorage.getItem('sessionID');
sessionStorage.removeItem('sessionID');
Example Login
- เพิ่ม
/composables/seUser.jsเพื่อเก็บข้อมูล user หลัง login
import { ref, watch } from 'vue';

export function useUser() {
  const username = ref(localStorage.getItem('username') || '');

  watch(username, (newVal) => {
    localStorage.setItem('username', newVal);
  });

  return username;
}- สร้างหน้า login page: LoginPage.vue และเพิ่ม route
- เมื่อ login ผ่านจะ save username ไว้ที่ local storage
<script setup>
  import { ref } from 'vue';
  import { useRouter } from 'vue-router';
  import { useUser } from '@/composables/useUser';

  const router = useRouter();
  const usernameInput = ref('');
  const password = ref('');
  const user = useUser();

  const handleLogin = () => {
    if (usernameInput.value && password.value) {
      user.value = usernameInput.value;
      router.push('/');
    } else {
      alert('กรุณากรอกข้อมูลให้ครบ');
    }
  }
</script>

<template>
  <v-container class="fill-height" fluid>
    <v-row align="center" justify="center">
      <v-col cols="12" sm="8" md="4">
        <v-card>
          <v-card-title class="text-h5">Login</v-card-title>
          <v-card-text>
            <v-text-field
              v-model="usernameInput"
              label="Username"
            />
            <v-text-field
              v-model="password"
              label="Password"
              type="password"
            />
          </v-card-text>
          <v-card-actions :style="{ justifyContent: 'right' }">
            <v-btn color="primary" @click="handleLogin">Login</v-btn>
          </v-card-actions>
        </v-card>
      </v-col>
    </v-row>
  </v-container>
</template>
s
- ปรับหน้า profile page ให้แสดงผลตาม local storage
<script setup>
  import MyProfile from '@/components/MyProfile.vue'
  import { ref } from 'vue'
  import { useUser } from '@/composables/useUser';

  const user = useUser();

  const firstName = ref(user.value)
  const lastName = ref('')
</script>

<template>
  <MyProfile :first-name="firstName" :last-name="lastName"/>
</template>
Template Ref
Template Ref ช่วยให้เราสามารถอ้างอิงถึง DOM หรือ component อื่นๆ ใน template ได้ง่ายๆ
<input ref="my-input">Accessing Ref
<script setup>
import { useTemplateRef, onMounted } from 'vue'

// the first argument must match the ref value in the template
const input = useTemplateRef('my-input')

onMounted(() => {
  input.value.focus()
})
</script>

<template>
  <input ref="my-input" />
</template>
ตัวอย่างการใช้งานกับหน้า Login
- focus input เมื่อไม่ได้กรอกข้อมูล
- เช็คความสูงของกล่องข้อมูล
<script setup>
  import { ref, onMounted } from 'vue';
  import { useRouter } from 'vue-router';
  import { useUser } from '@/composables/useUser';

  const router = useRouter();
  const usernameInput = ref('');
  const usernameInputRef = ref(null); // Input login ref
  const divLoginRef = ref(null); // div login ref
  const password = ref('');
  const user = useUser();

  const handleLogin = () => {
    if (usernameInput.value && password.value) {
      user.value = usernameInput.value;
      router.push('/');
    } else {
      alert('กรุณากรอกข้อมูลให้ครบ');
      focusUsernameInput();
    }
  }

  const focusUsernameInput = () => {
    usernameInputRef.value.focus();
  }

  onMounted(() => {
    console.log(divLoginRef.value.offsetHeight);
  });
</script>

<template>
  <div class="login-page" ref="divLoginRef">
    <h1>Login Page</h1>
    <v-container class="fill-height" fluid>
      <v-row align="center" justify="center">
        <v-col cols="12" sm="8" md="4">
          <v-card>
            <v-card-title class="text-h5">Login</v-card-title>
            <v-card-text>
              <v-text-field
                v-model="usernameInput"
                label="Username"
                ref="usernameInputRef"
              />
              <v-text-field
                v-model="password"
                label="Password"
                type="password"
              />
            </v-card-text>
            <v-card-actions :style="{ justifyContent: 'right' }">
              <v-btn color="primary" @click="handleLogin">Login</v-btn>
            </v-card-actions>
          </v-card>
        </v-col>
      </v-row>
    </v-container>
  </div>
</template>
Assignment
- ใช้ code จาก Assignment หัวข้อที่แล้ว
- เพิ่มระบบ router เข้าไปโดยมีหน้าจอดังนี้
- แสดงข่าวสาร ไทย - กัมพูชา
- หน้า Login
- หน้า User Profile
- ให้เพิ่ม page component สำหรับ แสดงราคาหุ้นโดยให้ user input ได้ว่าต้องการดูหุ้นอะไร
- ใช้ API
https://api.marketstack.com/v2/eod?access_key={key}&symbols={symbol}Reference: https://marketstack.com/dashboard - แสดงผลข้อมูลเป็นการ์ดหรือตารางตามเหมาะสม โดยข้อมูลมีดังนี้
- data.open: ราคาเปิด
- data.close: ราคาปิด
- high: ราคาสูงสุด,
- low: ราคาต่ำสุด,
- name: ชื่อหุ้น,
- exchange_code: ตลาด
- asset_type: ประเภทสินทรัพย์
- price_currency: ค่าเงินที่ใช้
- symbol: ชื่อย่อหุ้น
- โดยที่ user เข้ามาต้องสามารถ input ชื่อย่อหุ้นเพื่อดูข้อมูล หรือเข้าผ่านลิ้งค์ที่มี query parameter ก็ได้ เช่น
http://localhost:8080/market?symbol=AAPL
- ใช้ API
- เพิ่ม page, component สำหรับ แสดง Exchange ทั้งหมดในโลก แสดงผลเป็นการ์ดหรือ table ตามความเหมาะสม
- ใช้ API นี้
http://api.marketstack.com/v2/exchanges?access_key={key} - ข้อมูลที่ต้องการแสดง
- name: ชื่อเต็ม Exchange
- acronym: ชื่อย่อ Exchange
- country_code: code ประเทศ
- city: เมือง
- website: เว็บไซต์ Exchange : ข้อมูลนี้ไม่ต้องแสดง แต่กดปุ่มแล้วให้ไปยังเว็บไซต์นั้นได้
- ใช้ API นี้
Reference


![[Part 4] Frontend: Scaling Vue.js EP.1](https://images.unsplash.com/photo-1607799279861-4dd421887fb3?crop=entropy&cs=tinysrgb&fit=max&fm=jpg&ixid=M3wxMTc3M3wwfDF8c2VhcmNofDF8fHZ1ZS5qc3xlbnwwfHx8fDE3NTExMzMwNDJ8MA&ixlib=rb-4.1.0&q=80&w=1140)
![[Part 3] Frontend: Modern Framework + Vue.js 3](https://images.unsplash.com/photo-1585076641399-5c06d1b3365f?crop=entropy&cs=tinysrgb&fit=max&fm=jpg&ixid=M3wxMTc3M3wwfDF8c2VhcmNofDN8fGpxdWVyeXxlbnwwfHx8fDE3NTA5NDYzMDl8MA&ixlib=rb-4.1.0&q=80&w=1140)
![[Part 2] Frontend: Intermediate html/css/js](https://images.unsplash.com/photo-1669023414166-a4cc7c0fe1f5?crop=entropy&cs=tinysrgb&fit=max&fm=jpg&ixid=M3wxMTc3M3wwfDF8c2VhcmNofDR8fGh0bWx8ZW58MHx8fHwxNzUwNDkwMzI4fDA&ixlib=rb-4.1.0&q=80&w=1140)